Adding a custom widget inside a node using hook_node_view

Blog on web and travel
Posted on 16 Dec 2011 by Amitav Roy

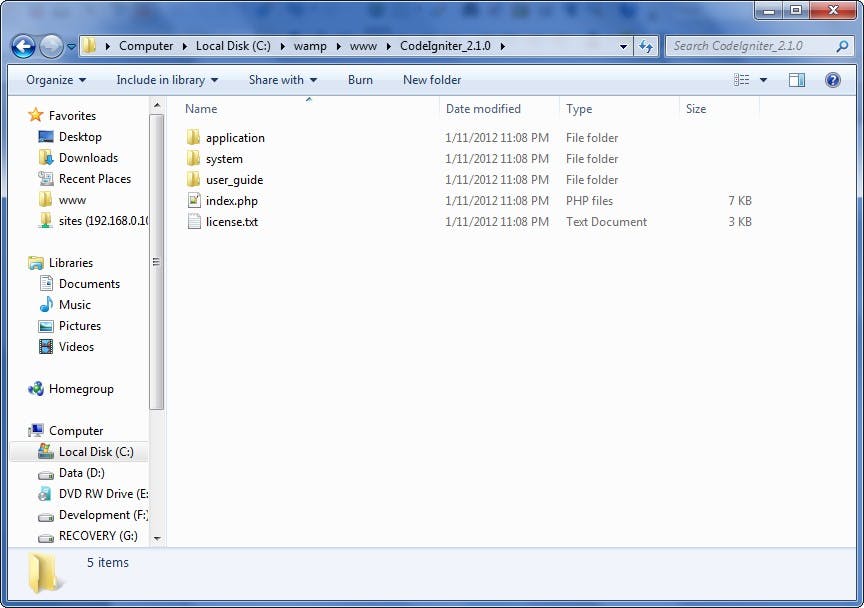
You can download the latest version of CodeIgniter from this link. The current version is 2.1.0. The total zip of the zip file is only 2.20MB which is quite nice and small compared to a few very heavy frameworks. Once, you download the zip file and extract it, you will find the following folder structure:
Here, the user_guide is the folder which is not required when you are going to deploy your site online. This is just the folder with the complete documentation. As mentioned, the documentation is amazing and so you can keep it while development and skip when uploading it to the server.
The system folder is where all the framework’s core code lives. This is not the place where we will be writing our code most of the time. For us, the most important folder is the application folder. This is the place where all our Controllers, Models and Views will reside. Inside the application folder, the three most important folder is the most usual ones: controllers, models and views. Inside the controllers folder, we will find the default welcome.php file which has the welcome controller which loads at the startup by default.
Before we get into actual coding, let’s check out a few settings which are very much essential from workflow point of view.
Inside config folder, the config.php holds a lot of configuration options.
base_url: http://localhost/CodeIgniter_2.1.0/ (in my case).
This is just to get the BASEPATH setting working which helps us a lot in file referencing. Once the base path is set, we can turn to the autoload.php file. This is the file which as the name suggests holds the settings for the things which will load at the startup. Inside this, we can specify which libraries, helpers and functions we want CodeIgniter to load automatically. This way, we don’t have to load those files every time we want to use one of the CodeIgniter built-in functions. For example, I will for sure want the database library to load automatically. Here is the setting:
So, once this is loaded, we need to define the database credentials or else CodeIgniter will throw error. By now you must have understood that for the database credentials, we need to edit the database.php file in the same folder. Here is what I have done to the four lines in the file:
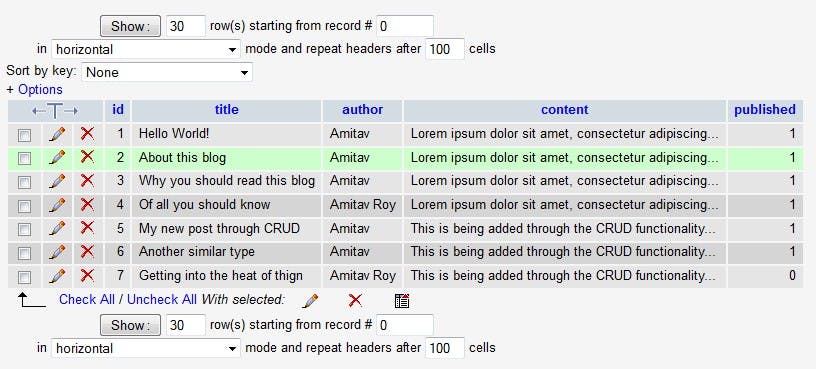
And here is a snapshot of my “blog” database. Right now it has only one table “data” which has few blog entries.
Once all this is done, we will create our first controller. The name of the controller will be blog. So, inside the controller folder, create a file “blog.php” file [NOTE: controller name and file name should be same].
Here we will need to create a class Blog which will extend the CI_Controller class. Here is the code snapshot:
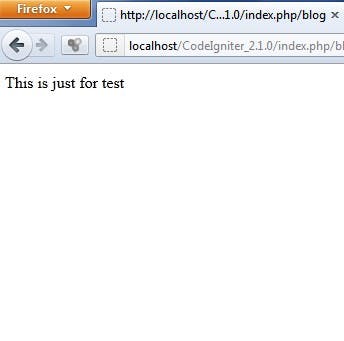
Inside the controller, the index function is always the first method which will be called, whenever someone goes to the blog. Although this is not the correct way to use controllers, just for test, if you print something inside the index function, you will be able to see that in the blog section. Here is a snapshot: